Showing posts with label input devices. Show all posts

Thursday, February 20, 2014

Getting Prescription Lenses for Google Glass - Part 2!

In my previous post, I described ordering the new Google Glass frames for prescription lenses and what the doctor experience was like. This is a follow up to that . . . actually getting and using the frames. I had a lot less questions in just picking up my frames with my new bifocal lenses. The doctor's staff was helpful and curious about them and fitted them to my face just like non-Glass frames.

The technicians had to adjust the nose piece/bridge so the prism was properly positioned just above my eye. I am fussy, so they let me attach my Glass to the new frames because I wanted to, but they were fully schooled in how to do it. I have to say, if you are in the San Gabriel Valley area of Los Angeles county you should check out Dr. Bettelheim, he and his colleagues at Arrow Vision Center run a great shop for non-Glass and non-Glass vision health.

I got the new frames last week, but wanted to use them a bit before I posted again, to see how I liked them. As with all new glasses I have received in my life (glasses wearer since 3rd grade!), it took a few hours to get used to the slight difference in prescription and frame size, but after that they "disappeared" from my conscious mind like all good glasses should. Having Glass with lenses was great because now they felt more natural and I have worn Glass more as a result.

On the US President's Day holiday, I went beer-tasting and had a good time shooting photos and keeping informed without feeling I had this device on my head. It is just my regular glasses, enhanced!

Another benefit is the more comfortable fit while bike-riding. I need a helmet riding and being able to wear regular frames + Glass is more natural. If you want to see what it is like, check out the video I made of the Claremont Thompson Creek Trail with Glass. I can ride and see and record with ease. All-in-all the prescriptions frames are the best accessory for Glass and will allow me to use it much more often.

Sunday, January 26, 2014

Evolving - Analog to Digital

It started with re-organizing the garage. Over the Christmas break, I happened to sell my 1904 Beckwith Reed Organ to a couple of young musicians who are going to put it into a historic house in L.A. along with a lot of other instruments to make a funky space for musicians to gather and play. That happy event opened quite a bit of room in the garage, and so the organizing began.

As part of that, I came across a couple of boxes of old cassette tapes I have been carting around. Occasionally I'd play Pieces of Eight by Styx or whatnot while in the garage since I have a portable radio / tape player on my workbench. But most of these I have not listened to in 2 decades since getting a state-of-the-art JVC CD player in 1982. What to do?

My First CD Player!
I realize digitizing analog is not a new venture, but I had never done it, being a huge fan of vinyl I had not seen the need to convert my records. And I have hundreds of those, so the task was daunting . . . a non-starter.

But the tapes! Sure I had some commercial stuff and a whole row of Windham Hill stuff, but the treasure was the personal recordings. My precocious daughter reading stories at 3, love recording of my playing my folk songs, some lecture I had given on Practical Project Management. This was the irreplaceable stuff that I wanted to save from the ravages of magnetic deterioration.

So I took down the old dusty Kenwood KX77-CW tape deck I got from my brother Greg (RIP - see the guy in the cap!) and set to work figuring out the best and most efficient process for turning lead (er, Chromium) into gold!

Connecting up is straightforward, just get the RCA out into the "line in" of the computer. Here is a lot more about that. Next, a clean tape player is essential so check out this extensive tutorial. Don't drink the isopropyl alcohol! The best software I found was Audacity. It is open source and has tons of features. I wanted to make MP3 files for upload into my Google Play account, so I also got the MP3 plug-in for Audacity which is called LAME. After the hardware is plugged in and the software is setup, I was ready to rip!

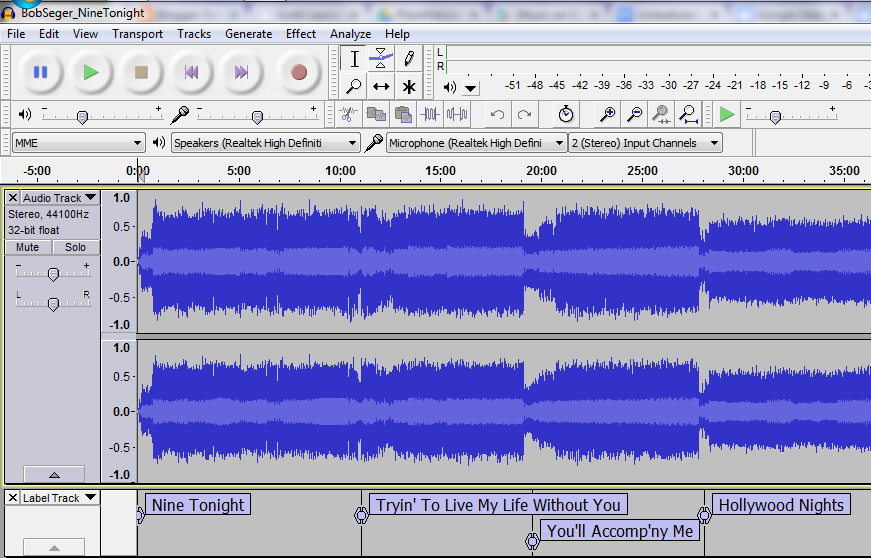
Audacity on Windows - Bob Seger Live Album, "Nine Tonight:
It all boils down to opening a new Audacity file, pressing play on your tape deck and clicking record in Audacity. After the tape is copied into the computer you can then make it ready for its digital life which involves a basic clean up, adding metadata, putting labels at the beginning of each song, and then saving the songs off as a batch. Below I have a list of what I did (on Microsoft Windows) for each tape to go from almost obsolete to all-digital awesome!

  1. Start Audacity and press play on the tape deck. Turn on monitoring in Audacity so you can hear your cassette playing.
  2. Set audio levels to peak just under -6 db so you get all the sound but no distortion.
  3. To do a whole album from tape set the player to auto reverse.
  4. Press play on tape player and then press record in Audacity.
  5. You can listen along or go a do something else until the tape is fully played and recorded.
  6. Save basic metadata of the artist name, album title, year, and genre.
  7. Save your file as a Project (as an AUP file) to allow editing later. Remember to save the project as you go along!
  8. Export the raw audio as a WAV file for an uncompressed backup just in case!
  9. Select a few seconds of 'silence' at the beginning and choose Effect > Noise Removal
  10. Click the Get Noise Sample button in the Noise Removal dialog box. The dialog will close.
  11. Press CTRL + A to select all of the audio.
  12. Choose Effect > Noise Removal, accept the defaults, and click OK.
  13. Wait for the noise to be removed. This will take a few minutes
  14. Press CTRL + A to select all of the audio again.
  15. Click Effect > Normalize, accept the defaults and click OK.
  16. Wait for the audio to be "normalized". This makes the sound as loud as possible so you don;t have to crank your volume when listening to your new digital file. Normalization will also take a few minutes.
  17. Zoom out on timeline and delete and 'silence' you do not want in there. Carefully place you cursor at the beginning of each song, press CTRL + B to add a label.
  18. Type in the name of the track. Repeat for each track. If you don't have the details, Wikipedia is great for getting the exact names of tracks and details your old tape might not have.
  19. Once you have the file the way you want it, choose File > Export Multiple. This will step through your file and create individual MP3 files for each song, titled with your labels. Make sure you create a folder with the name of the artist first and the album under it (which is what iTunes and Google Music likes) to have you music neatly organized.
  20. The final step is to add/upload the folder with your new digital files to your music player like iTunes or Windows Media Player or Google Play.
There can be a lot more you can do and read about, but for me, simply getting a "lost" tape into digital format is perfect. I use Google Play and after upload, I can get in my car, and use my android phone with 3G and Bluetooth connections pulling the music from Google Play I can listen to old "tapes" in my new car. 

And they sound groovy, man!


Tuesday, November 19, 2013

How To Capture and Publish Videos with Google Glass

Today, November 19, 2013, I presented a session (C103) at the Streaming Media West conference that showed how to use Google Glass to capture videos for the corporate or enterprise environment and automatically publish them to a corporate server for employee use. The aim of my talk and demonstration was to show how the new form factor of Google Glass, a wearable computer can remove barriers for the regular employee to create and publish video information for corporate use.

On my website, I have posted the slides today and will link the recorded presentation when it is made available to me. And here is the Mediasite Catalog that contains the test videos.
Enjoy!


Monday, October 28, 2013

Google Glass at Streaming Media West


If you are in Southern California mid-November, come and check out my talk on Google Glass at Streaming Media West conference. It is at the Hyatt Regency in Huntington Beach on November 19 at 1:45 PM. 

The description is below, but I hope (may the demo gods allow!) to show a live example of recording a video, uploading it and publishing it to our Mediasite corporate streaming server. I'll talk about Google Glass and the uses it can have in industry (doing actual work!) and the services you need to set this up for yourself. Here are the details:

Session C103, Nov. 19, 1:45 PM
HOW TO: Using Google Glass to Capture and Publish Videos
Google Glass can make the creation of video content for business, education, and entertainment easy for all people who want to communicate simply and quickly. This presentation looks at Glass and its capabilities, discusses the best practices for capturing content, explores example real-world uses, and details the steps for setting up sharing. Attendees see a live demo of the workflow from recording to publishing right in the session.
See you there!

Wednesday, July 24, 2013

Leap Motion Review - Practical Impressions - #firstleap

I had ordered the little thing back in Fall of last year . . . did not have to pay for it at the time, so I thought, what the heck! Fast forward 8 months and it arrived by USPS today. I ordered it thinking that since I am a proponent of voice control and dictation, this new way of interacting with the PC would be enlightening.

The software took a very long time to download, possible because of the Leap Motion servers being very busy this week for launch. The apps from Airspace take a while to download, too, so I had to be patient. Four basic utilities are installed: the device driver, the visualizer which helps you learn basic hand movements, the Control Panel, and Airspace, which is the app store and special launcher for your Leap Motion enabled apps.

After waiting again for a download (I had to switch to a different laptop because while the driver did load on the first one, the Leap Motion did not respond) I was able to run the orientation. This worked OK and gave me insight into how this was really going to work. It sees your fingers and hands, but you have to know how they will be recognized. Many times I was not skilled at operating the apps because the controller would only "see" three out of five fingers or my thumb got in the way.

Hands in the air!
While I think this is a ground-breaking device, using the Leap is harder than I imagined. Sort of like starting out using voice recognition. Practice is required. I loaded a few of the free apps to try it out. Touchless has the most potential and after 20 minutes I could navigate where I wanted, but it was certainly a lot more difficult than using a mouse. But then, 20 years ago, formatting a document in WordPerfect for DOS with Reveal Codes was faster than mousing around in MS Word! Playing a few of the games, like the simple "Cut the Rope" is fun and it seems like it is built for this type of handwaving in air interaction.

The 7 apps I have installed. Lotus crashed three times on load so I did not use that one yet.
The hardest part to get used to is that you have no touch feedback doing gestures in the air. With a mouse or a pen or even a touch screen you have contact with some tool or device and can learn quickly how to compensate your movements. With the Leap and the airspace you are called to gesture in, it is difficult to calibrate your brain for where your fingers will be the most effective. This input device is indeed a brand new paradigm.

Learning it reminds me of my work teaching people in the late 1980s and early 1990s how to use a mouse. Believe it our not, many very smart people in my classes took days to get used to that input device. I think the Leap Motion is going to be the same.